Buying crowd control stanchions comes down to two questions that people usually answer in the wrong order. They start with what the posts look like, then discover halfway through setup that they bought the wrong type, too few of them, or bases too light to stand up outdoors. Flip it around. Decide what the stanchions have to do and where they have to do it, then let that pick the type, the base, and the count. Here is how to work through it.
Retractable belt, rope-and-post, or plastic: pick by setting
Three families of stanchion cover almost every situation. Retractable belt posts have a webbing belt that pulls out of a cassette in the post head and clips into the next post, usually in lengths from about 7.5 to 13 feet. They are the workhorse for indoor queues at banks, airports, box offices, and retail because a single person can reconfigure a whole line in minutes and the belt tidies itself away. Rope-and-post stanchions, the polished brass or chrome posts with a velvet rope, are slower to move and fixed in length, but they signal occasion, which is why they show up at events, hotels, and anywhere a red carpet is involved. Plastic stanchions, often with fillable bases, are the outdoor and industrial choice: cheaper, weather-tolerant, and easy to store in bulk for parking lots, construction edges, and temporary event perimeters.
The setting usually makes the call for you. A climate-controlled lobby can use a handsome metal post with a modest base; a windswept sidewalk needs weight and weather resistance more than it needs a mirror finish. If the same posts have to work both indoors for an event and outdoors for load-in, prioritize the outdoor demands, because a post that survives wind will always survive a lobby, but not the reverse.
Base weight is the stability spec that matters
The single most overlooked number on a stanchion is the weight of its base. A typical indoor post rides on a concrete-filled steel base around 20 pounds, with cast-iron bases running a bit heavier and low-profile bases lighter. That is plenty for an orderly indoor line where nobody is leaning on the belt. Outdoors, or anywhere a crowd might push, you want more mass, which is why fillable bases you load with sand or water exist; filled, they can far outweigh an indoor base and resist both wind and the tug of a retracted belt that someone lets snap back.
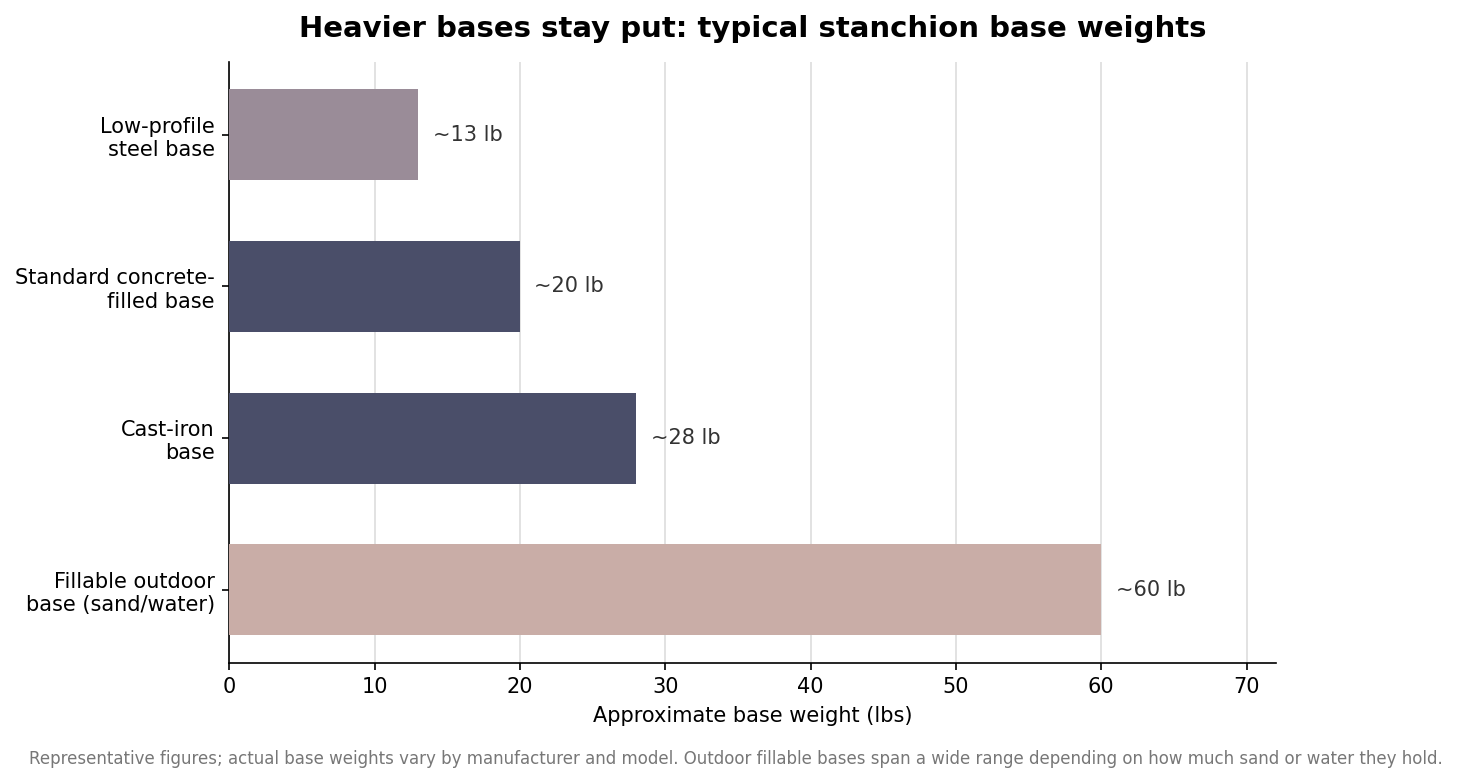
Belt tension is a real force here. A retractable belt is under spring load, and if a light post is knocked or the belt is released carelessly, an underweight base can tip. When in doubt, favor the heavier base, keep belts clipped rather than left to recoil freely, and add a base cover if aesthetics matter, since covers hide a heavy utilitarian base without reducing its weight.
How many posts you actually need
Counting posts is simple arithmetic once you fix your spacing. As a rule of thumb, keep posts no more than 6 feet apart, center to center, so belts stay taut and the line reads clearly; tighten to 3 or 4 feet where you need firmer control or where children and carts are in the mix. To size a straight run, divide the length of the queue by your spacing and add one post for the starting end. A 30-foot line at 6-foot spacing needs six posts; the same line at 4-foot spacing needs nine. Order a spare or two beyond the calculation, because layouts almost always grow once you see the real space.
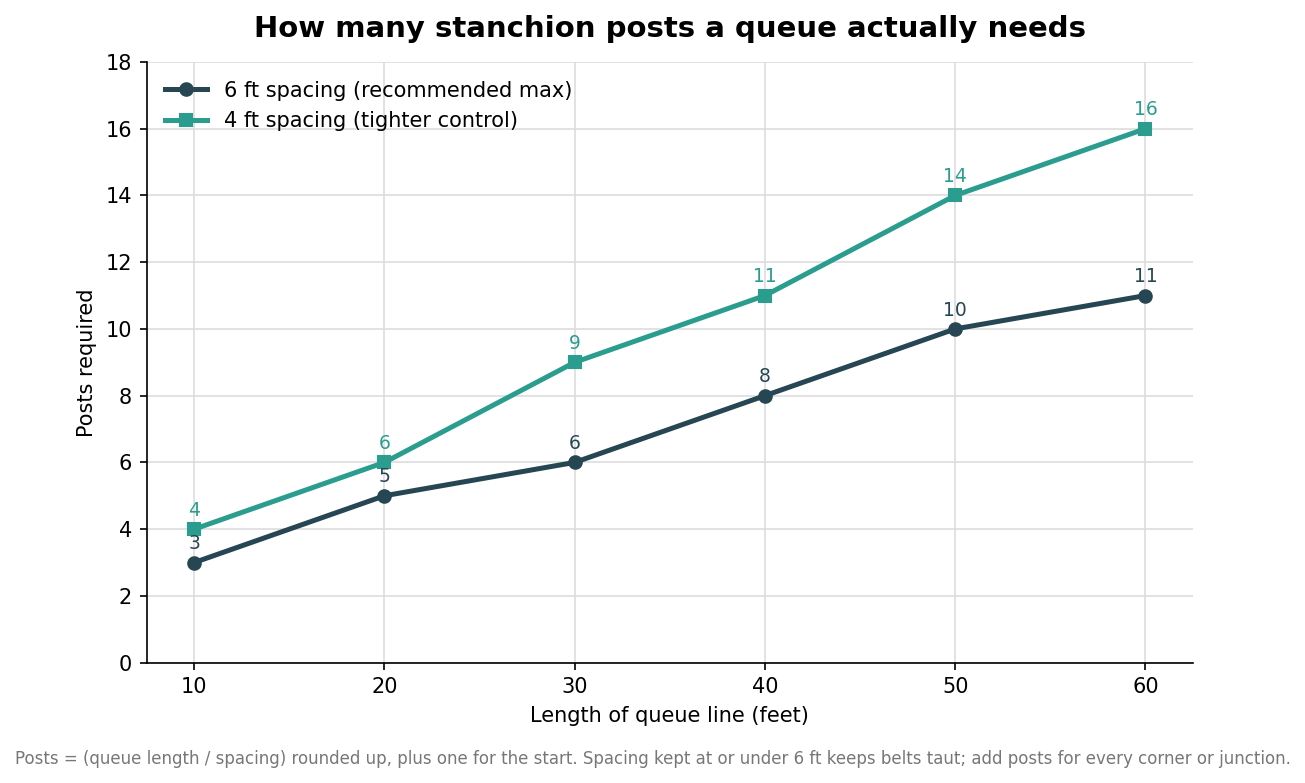
Spacing is not only an aesthetic choice. Belts left to span more than their comfortable length sag, which invites people to duck under or lean on them, and a sagging belt across a wide gap is easier to trip over. Keeping spans short and belts near horizontal is what makes a queue actually direct traffic instead of just decorating it.
Corners, junctions, and multi-belt posts
Straight runs are the easy part. The count climbs at every corner and junction, because a post that only turns a corner still needs a belt receiver facing each direction. Most basic posts carry a single belt cassette and one or more fixed receivers, while posts built for complex layouts offer receivers on multiple sides so one post can anchor belts running three or four ways. If your plan snakes back on itself, a serpentine queue, budget a post at every turn and every merge, not just along the straights. Sketch the path first and mark a dot everywhere a belt starts or ends; the number of dots is your real post count, and it is usually higher than the straight-line math suggests.
Keeping the line accessible
An accessible queue is both a legal expectation and a practical one, since a line that a wheelchair or stroller cannot navigate backs up for everyone. Keep the clear width of each lane generous, commonly a minimum around 36 inches, with wider entry and exit lanes near 48 inches to smooth the pinch points where people enter and leave. Turns need room too, so plan for a larger clear space wherever the line changes direction. One detail catches people out: a single mid-height belt is not detectable to a person using a white cane, so venues that take accessibility seriously add a lower detectable element or choose double-belt posts where the lower belt sits low enough to be found by a cane sweeping the floor. Confirm current requirements for your venue type, but designing to these dimensions from the start costs nothing and prevents an awkward retrofit later.
Work in this order and the buying decision falls out cleanly. The environment picks the type and the base weight, the queue length and spacing pick the count, and the corners and accessibility rules add the posts most people forget. Sort those out before you think about finish and branding, and you end up with a line that moves people smoothly, stays standing where you put it, and looks the part while doing it.